
Table of Contents
1. The Short Version: Three Things Actually Block You — a Mac, the Annual Fee, and the Xcode 26 Mandate
Shipping a first iOS app requires a surprising amount of work beyond writing code. The places people get stuck, though, are predictable.
- You need a Mac. Xcode runs only on macOS. There is no supported path that stays entirely on Windows or Linux.
- You need to keep paying. The Apple Developer Program costs $99 USD per year and recurs for as long as you want the app listed.[1] Google Play charges a one-time $25 registration fee instead — a structurally different deal.[11]
- Since April 28, 2026, builds must use Xcode 26 and the iOS 26 SDK. Binaries built with older Xcode versions are rejected at upload time.[2]
On the other hand, iOS has no pre-release testing quota comparable to Google Play's requirement that new personal accounts keep 12 testers opted in for 14 consecutive days. TestFlight beta distribution is strongly advisable but not mandatory. On that axis, iOS is clearly the lighter platform.
This article is the iOS counterpart to Publishing Your First Android App to Google Play, and walks the same ground at the same level of detail.
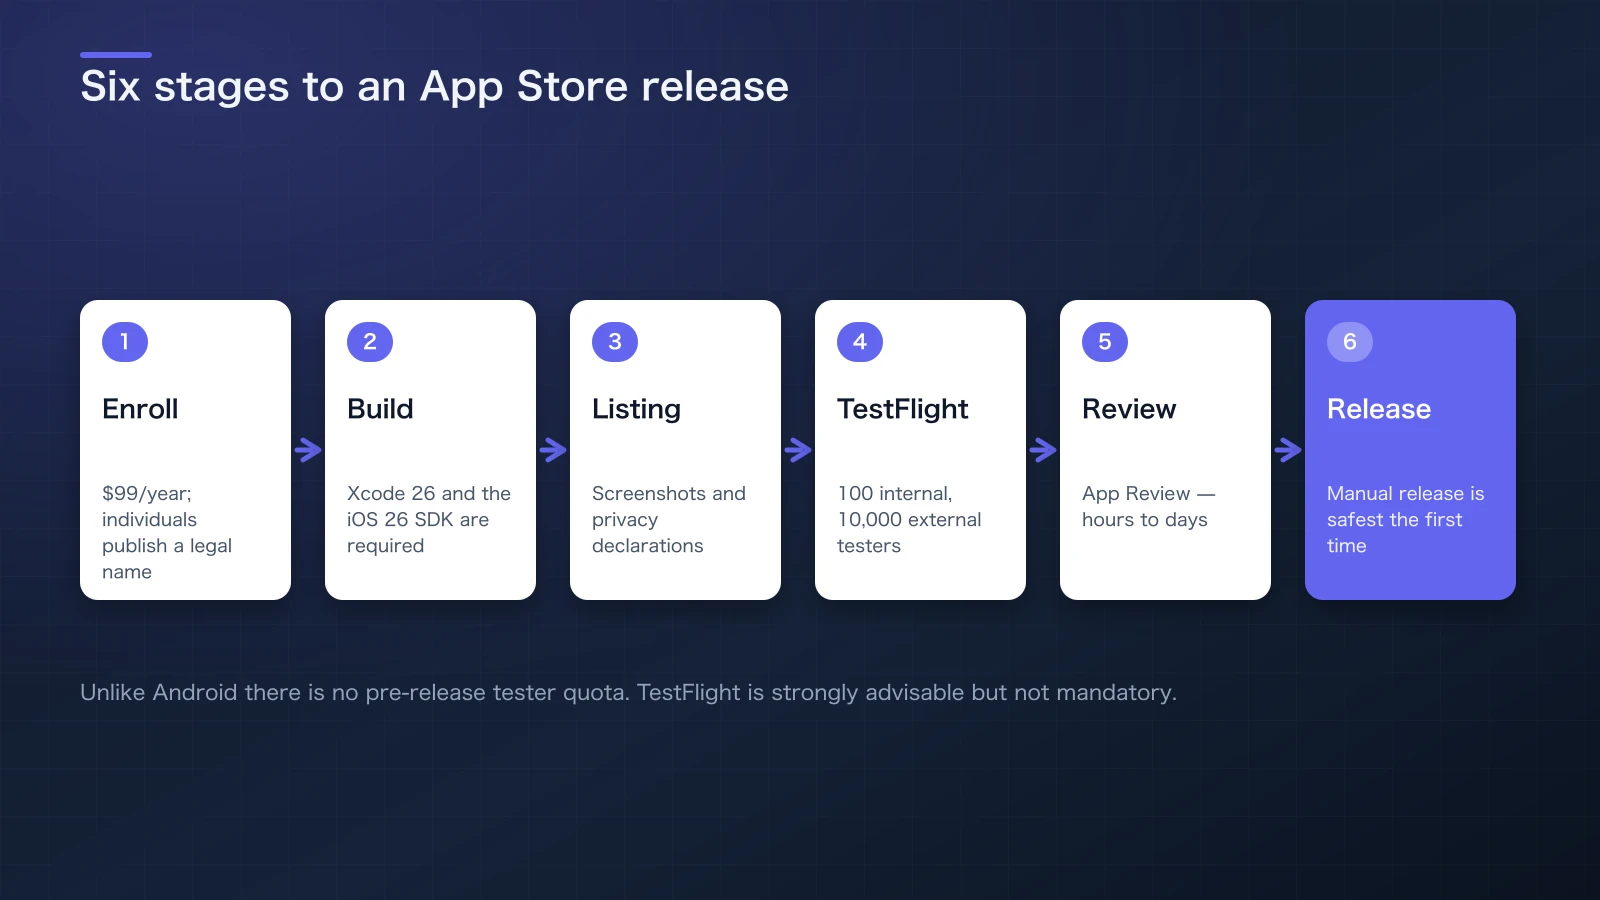
Figure 1: Six stages. Unlike Android there is no pre-release tester quota, but the SDK version and review guidelines bind much harder.
2. Prerequisites: Enrolling in the Developer Program, and the Mac Requirement
2-1. Individual vs. Organization
You choose one at enrollment. Both cost $99 per year, but the seller name shown on the App Store differs.[1]
| Type | Seller name shown publicly | What you need |
|---|---|---|
| Individual | Your own legal name | Identity documents, a payment card |
| Organization | Your company name | A legal entity, a D-U-N-S number, entity verification |
The detail indie developers most often miss: enrolling as an individual publishes your real name in the App Store's seller field. Using a handle elsewhere doesn't change this. To list under a business name, you need a legal entity and an Organization enrollment.
2-2. The Fee Is a Recurring Cost, Not a Setup Cost
Unlike Android's one-time $25, Apple's $99 recurs annually. If the membership lapses, your published apps are removed from the App Store. For a hobby app you'd like to leave running untouched for years, that difference matters more than it first appears.
Apple does waive the fee for qualifying nonprofits, educational institutions, and government entities, but individual developers are not eligible.[3]
2-3. Getting a Mac
Xcode is macOS-only, and the archive you submit to the App Store can only be produced by Xcode (or xcodebuild). If you don't own a Mac, a used Mac mini or a cloud Mac service are the usual routes. Check Xcode's release notes for the macOS version Xcode 26 requires.
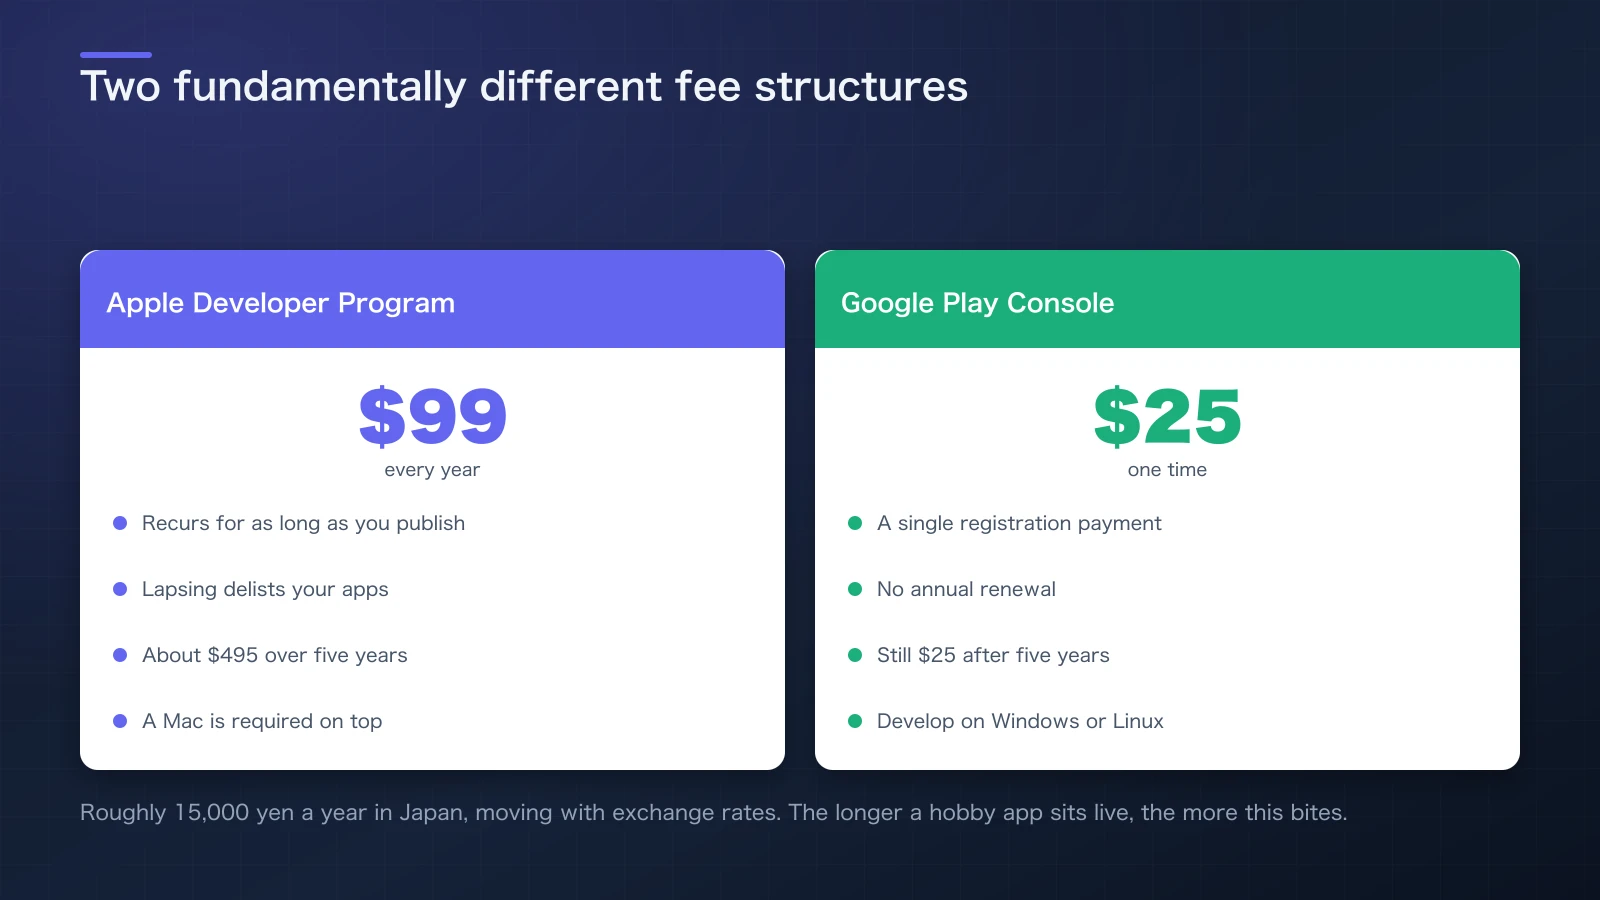
Figure 2: Apple charges $99 every year; Google charges $25 once. The gap widens the longer the app stays listed — and on Apple, lapsing delists it.
3. Building: Xcode 26 and the iOS 26 SDK Are Now Mandatory
3-1. The April 28, 2026 SDK Requirement
Since April 28, 2026, apps uploaded to App Store Connect must be built with Xcode 26 or later against the iOS 26 / iPadOS 26 / tvOS 26 / visionOS 26 / watchOS 26 SDKs.[2] This does not mean your app must require iOS 26. It constrains the SDK you build against; your Minimum Deployments target is a separate setting you still control.
Conflating the two leads people to think adopting the iOS 26 SDK means dropping older devices. It doesn't — build against the iOS 26 SDK while setting Minimum Deployments to, say, iOS 17, and older devices still receive the app.
3-2. Signing: "Automatic" Is Fine
Apple's certificates and provisioning profiles are the rough analogue of Play App Signing. For solo development, enable Automatically manage signing in Xcode and attach your Apple ID; certificates and profiles are generated for you. Manual management only becomes necessary for CI/CD signing or shared team keys.
The mappings worth memorizing:
| Concept | iOS | Android |
|---|---|---|
| Distribution package | .ipa (produced by Xcode from an archive) | .aab (Android App Bundle) |
| Key management | Certificate + provisioning profile (Apple-managed) | Play App Signing (Google-held) + upload key |
| Unique identifier | Bundle ID (e.g. com.example.myapp) | Package name (e.g. com.example.myapp) |
| Version fields | CFBundleShortVersionString + CFBundleVersion | versionName + versionCode |
The Bundle ID cannot be changed after publishing — same rule as Android's package name. Decide it deliberately.
3-3. Archiving and Uploading
- Set the build destination to Any iOS Device (you cannot archive a simulator build).
- Run Product → Archive.
- When Organizer opens, choose Distribute App → App Store Connect.
- Once validation passes, the build uploads and appears under App Store Connect's TestFlight tab within minutes to tens of minutes.
Freshly uploaded builds sit in a processing state and can't be submitted until processing finishes.
3-4. Declaring Export Compliance for Encryption
An easily missed one: ITSAppUsesNonExemptEncryption in Info.plist. Without it, you're asked whether your app uses encryption on every single upload. Ordinary apps that only speak HTTPS often fall under an exemption, but whether that applies is a judgment about your own implementation.
4. App Store Connect: Listing Metadata and Screenshots
4-1. Creating the App Record
In App Store Connect, go to My Apps → + → New App. Set the name, primary language, Bundle ID, and SKU (an internal identifier for your own bookkeeping).
4-2. Screenshots and Icon
The required sizes have been consolidated compared with earlier years.[4]
| Asset | Size | Notes |
|---|---|---|
| App Store icon | 1024×1024 px | No transparency, sRGB PNG/JPEG |
| iPhone screenshots | 6.9-inch, 1320×2868 px | If omitted, 6.5-inch is required. At least one needed |
| iPad screenshots | 13-inch, 2064×2752 px | Required only if you declare iPad support |
App Store Connect rejects files that are off by even a single pixel, so lock down your export settings up front.
Note that declining iPad support removes the iPad screenshot requirement entirely. To keep a first release light, shipping iPhone-only and expanding later is the easier operational path.
5. Privacy Declarations: Three Different Things That Must Agree
This is the single most rejection-prone area as of 2026, which is why it gets its own chapter.
5-1. Three Distinct "Privacy" Artifacts
| Name | What it is | Where it lives |
|---|---|---|
| Privacy policy URL | A link to a publicly reachable static page | App Store Connect, app information |
| App Privacy ("nutrition label") | Your declaration of what data you collect, shown on the store listing | App Store Connect, App Privacy [5] |
| Privacy manifest | PrivacyInfo.xcprivacy — declares required-reason APIs and data collection inside the bundle | A file in your Xcode project [6] |
These three must not contradict each other, and mismatches are exactly what gets flagged in 2026. The classic failure is a binary that collects an advertising identifier while App Privacy claims no collection.
5-2. Account Deletion Is Mandatory
Apps that let users create an account must provide an in-app path to delete that account. Directing users to a contact form alone can be judged insufficient.
5-3. App Tracking Transparency
If you track users across other companies' apps and websites, you must request permission through Apple's own ATT dialog. Substituting a custom-built dialog is grounds for rejection.
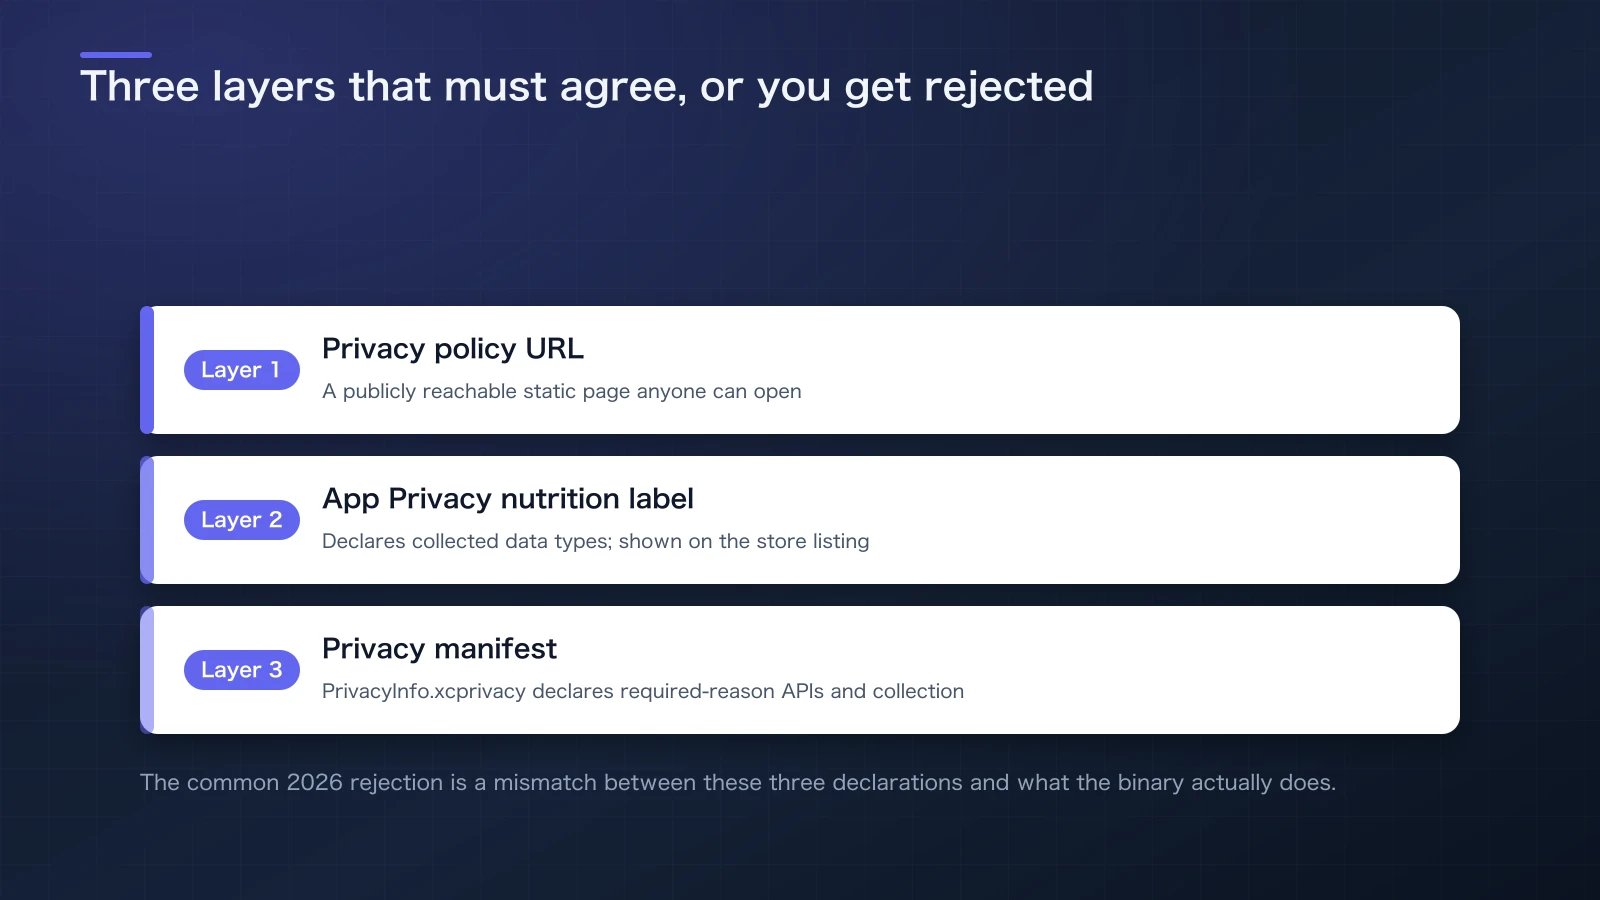
Figure 3: Privacy spans three layers. Any disagreement between them and the actual binary becomes the rejection reason.
5-4. The Age Rating Questionnaire
Apple overhauled age ratings in 2025, adding 13+, 16+, and 18+ while retiring 12+ and 17+. Developers were required to complete an updated questionnaire by January 31, 2026; apps that didn't are blocked from new submissions and updates.[7] New enrollments today simply answer the current questionnaire from the start.
6. TestFlight: 100 Internal Testers Instantly, 10,000 External After Review
TestFlight has two tracks with genuinely different behavior. Confusing them costs a lot of time wondering why testers aren't receiving builds.
| Track | Capacity | Beta App Review | Time to distribution |
|---|---|---|---|
| Internal | Up to 100 App Store Connect users | Not required | Minutes after processing completes |
| External | Up to 10,000 (link or email invite) | Required | Typically several days as of 2026 |
Internal testers must be users you've invited to App Store Connect itself — you can't simply add a friend's email address. To distribute broadly, use the external track and clear Beta App Review.[8]
Unlike Android, TestFlight testing is not a precondition for release. That said, submitting to review without ever running on a physical device is reckless, so in practice running the internal track at minimum is the sensible baseline.
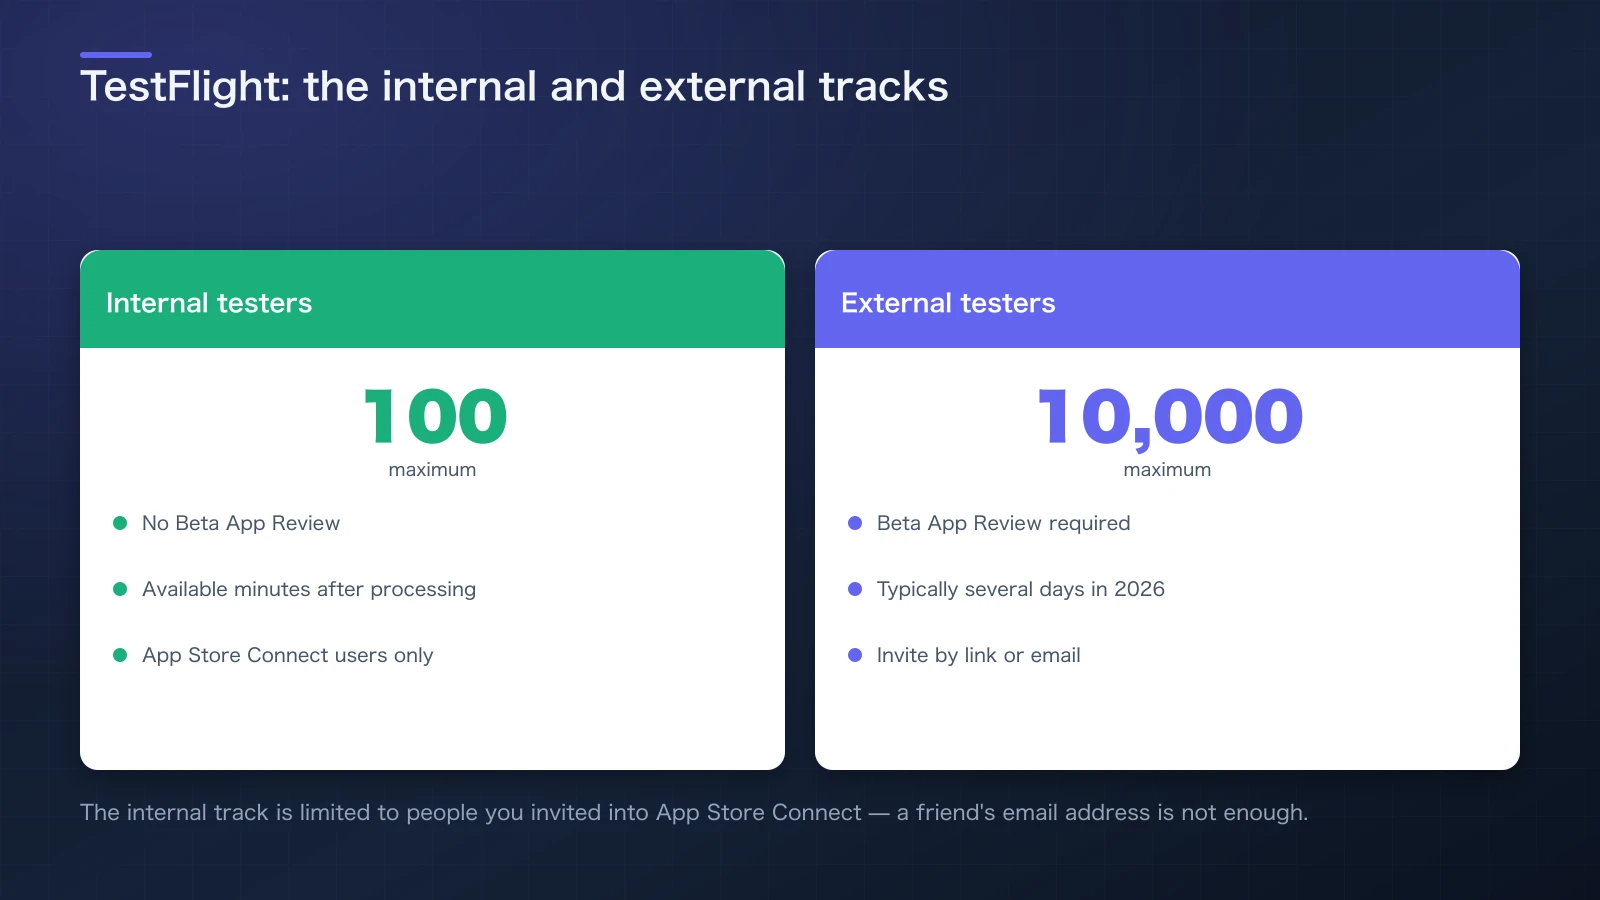
Figure 4: The internal track ships same-day with no review; the external track adds Beta App Review. The capacity differs by two orders of magnitude.
7. Submitting for Review, and What Actually Gets Rejected
7-1. How Long Review Takes
Apple states that the majority of submissions are reviewed within 24 hours.[9] In practice, several days is unremarkable, and longer delays were reported through the first half of 2026. The realistic posture is not to promise a launch date that assumes a 24-hour turnaround.
Expedited Review exists for genuine emergencies, but the number granted per account is limited — save it for when it matters.
7-2. The Rejections That Actually Bite in 2026
Cross-referencing the published review guidelines with commonly reported patterns, the mines indie developers step on cluster here.[10]
| Guideline | Issue | Typical indie cause |
|---|---|---|
| 1.5 Support URL | The support URL doesn't work | The page 404s, or is still a placeholder |
| 5.1.1 Privacy | Missing policy, or declarations contradicting the binary | App Privacy answers don't match the implementation |
| 4.2 Minimum functionality | Too little functionality; effectively just a website | A WebView wrapper around an existing site |
| 2.1 App completeness | Reviewer can't exercise the app | No demo account supplied; reviewer blocked at login |
4.2 (Minimum Functionality) is the one indie developers wrapping an existing website hit most often. You need genuine native integration and an experience that justifies being an app.
Equally important: if your app requires login, always supply a demo account for the reviewer in the App Review Information section. Leaving it blank reliably earns a 2.1 rejection for being unverifiable.
7-3. Choosing How to Release
Once approved, you control the timing.
- Manual release: publish when you choose. Safest for a first launch.
- Automatic release: goes live as soon as it's approved.
- Phased release: for updates, rolls out gradually over seven days — the analogue of Android's staged rollout.
Phased release is an update-only feature and isn't available for a first launch. Ship the initial version on manual release so you can inspect the live listing before it goes public.
8. iOS vs. Google Play, Side by Side
"Publishing as an individual" means quite different things on the two platforms.
| Dimension | iOS / App Store | Android / Google Play |
|---|---|---|
| Registration fee | $99/year, recurring | $25, one time |
| Development machine | Mac required | Windows / macOS / Linux |
| Distribution format | .ipa | .aab |
| Build requirement | Xcode 26 + iOS 26 SDK (from Apr 28, 2026) | Target API 36 (from Aug 31, 2026) |
| Mandatory pre-release testing | None (TestFlight optional) | 12 testers × 14 days for new personal accounts |
| Review | Primarily human review; hours to days | Automated + human; several days |
| Staged rollout | Updates only, over 7 days | Available from the first release, by percentage |
A useful compression: iOS front-loads the cost (money and a Mac); Android back-loads it (the testing requirement). If you're shipping to both, the time-efficient play is to run Android's 14-day closed test while iOS review proceeds in parallel.
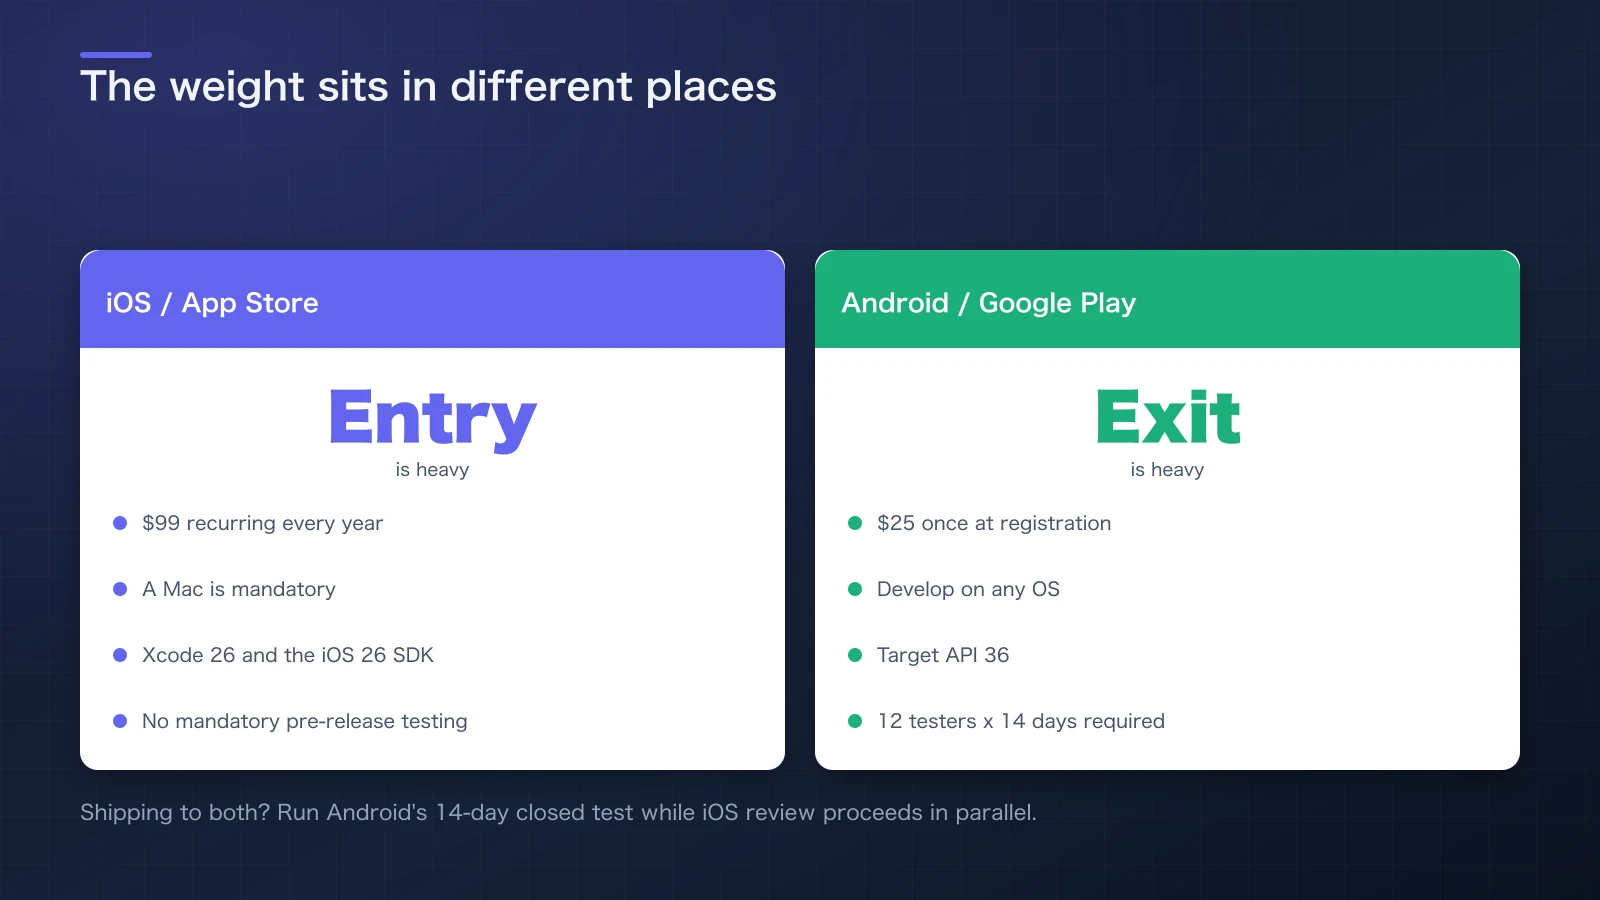
Figure 5: The weight sits in different places — iOS at the entrance (annual fee and a Mac), Android at the exit (12 testers × 14 days).
9. A Ready-to-Use Checklist
Enrollment and build
- [ ] Enrolled in the Apple Developer Program (Individual publishes your legal name)
- [ ] Able to build with Xcode 26+ against the iOS 26 SDK
- [ ] Bundle ID finalized (cannot be changed after publishing)
- [ ]
Minimum Deploymentsset to your intended oldest iOS version - [ ] Certificates and profiles via Automatically manage signing
- [ ]
ITSAppUsesNonExemptEncryptionset inInfo.plist - [ ] Uploaded via Product → Archive → Distribute App
Store listing
- [ ] Icon 1024×1024 (no transparency, sRGB)
- [ ] iPhone 6.9-inch 1320×2868 screenshots
- [ ] iPad 13-inch 2064×2752 (only if declaring iPad support)
- [ ] Description, keywords, and a support URL that actually resolves
- [ ] Privacy policy URL on a publicly reachable static page
Privacy and review readiness
- [ ] App Privacy answers match the implementation
- [ ]
PrivacyInfo.xcprivacybundled, declaring required-reason APIs - [ ] In-app account deletion, if the app has accounts
- [ ] Apple's ATT dialog, if you track across apps and sites
- [ ] Age rating questionnaire completed
- [ ] Demo account and notes filled into App Review Information
Testing and release
- [ ] Verified on a physical device via internal testers (up to 100)
- [ ] External track cleared through Beta App Review if needed (up to 10,000)
- [ ] First release set to manual so you can inspect the listing
- [ ] Phased release (7 days) used for subsequent updates
10. Conclusion
What trips people up on iOS isn't the code — it's the prerequisites and the consistency of your declarations. Absorb the entry cost of a Mac and the annual fee, build with Xcode 26 and the iOS 26 SDK, and make the three privacy layers (policy URL, App Privacy, privacy manifest) agree with what the binary actually does. Get that far and review becomes markedly smoother.
Because there's no pre-release tester quota, the shortest path to a first release is genuinely shorter on iOS. The trade is the recurring $99 — a real consideration for a hobby project you intend to leave running. Understand those two facts and you can decide which store to ship to first.
The Android side is covered in Publishing Your First Android App to Google Play; read both if you're targeting each.
References
- [1]Apple Developer, Apple Developer Program — What's included. ↩
- [2]Apple Developer, Upcoming requirements. ↩
- [3]Apple Developer, Fee waivers. ↩
- [4]Apple, Screenshot specifications — App Store Connect Help. ↩
- [5]Apple Developer, App privacy details on the App Store. ↩
- [6]Apple Developer, Privacy manifest files. ↩
- [7]Apple Developer, Updated age ratings in App Store Connect. ↩
- [8]Apple Developer, TestFlight. ↩
- [9]Apple Developer, App Review. ↩
- [10]Apple Developer, App Store Review Guidelines. ↩
- [11]Google Play Console Help, Open a Play Console developer account. ↩

NEW NOVEL 2026/08/01
Clouded Glass
Polishing is not about force.
Volume two of The World Became Slightly Farther Away.Five stories that can also be read as a starting point.
View on Amazon
Jijoden.com
Your life is worth writing.
There is a truer self you can tell only to AI.Gather fragments of memory into a single story.
Take a LookRelated Articles
Why ChatGPT Pro and Codex Are the Best Value for Indie Developers
A practical comparison of ChatGPT Pro, Codex, Cursor, Copilot, Claude Code, Devin, and Google AI Pro from the viewpoint of an indie developer who actually burns through AI tooling.
Two Axes Revealed by iOS 26.3 and iOS 26.4 Beta
A deep dive into iOS 26.3 interoperability changes and iOS 26.4 beta foundations, and what they mean for Siri’s redesign with Gemini.
Silver Week Reshapes AI: GPT-6 Astra, Sol and Luna vs Claude Fable, Opus and Sonnet
A six-model comparison of launch strategy, intelligence, API prices, measured task costs, caching and access: GPT-6 Astra, Sol and Luna versus Claude Fable 5.1, Opus 5.5 and Sonnet 5.
What Can You Share with AI? Approval Criteria for Enterprise Code and Customer Logs
Authorize enterprise AI use with six repository acceptance criteria, log-sanitization examples, contract decisions and a reusable approval template. Primary sources checked September 19, 2026 distinguish permitted work, prohibited transfers and case-specific review.
GPT-6 Astra Arrives: What Changes When You Put It to Work in Codex?
Our first article produced with Astra examines GPT-6 in Codex, its differences from GPT-5.6, comparisons with Fable 5.1 and Opus 5, ARC-AGI-3 testing conditions, international reactions, and the AGI debate. Sources checked September 6, 2026.